Paper l Microstructure and Mechanical Properties of CMSX-4 Single Crystals Prepared by Additive Manufacturing
1 Introduction and Motivation
CMSX-4® is a second generation single crystalline superalloy containing 3 wt pct Re with a γ’ volume content of about 70 pct.[1,2] Processing of these kinds of single crystalline alloys is usually by investment casting applying directional solidification.[3] Typically, this class of alloys shows strong segregations during solidification resulting in pronounced dendritic microstructures.[4] Thus, great efforts with respect to the casting process as well as the successive heat treatments have been undertaken to homogenize the microstructure in order to improve high-temperature properties.[3,5]
Generally, single crystalline components evolve from a starter block superimposed on a cooled copper chill plate combined with a spiral grain selector. The role of the chill plate is to generate a high number of grain nuclei. During solidification within the starter block, favorably oriented grains with respect to the direction of the temperature gradient prevail. The following helix has the task to select one of these already oriented grains. Ideally, only one grain remains after passing the spiral grain selector.[6]
Additive manufacturing (AM) is an upcoming technology that is getting more and more established in industrial production in the field of medicine,[7] energy production, or aerospace applications.[8] For metals, two powder bed-based methods are typically used: Selective Laser Melting (SLM)[9,10] or Selective Electron Beam Melting (SEBM).[11] Both methods are powder bed-based, layer-by-layer techniques where a powder layer is applied on a building area and selectively molten by a moving heat source. AM offers many advantages: complex geometry, weight reduction, short lead times, integration of functions, etc. In addition, there is a high potential of the process-inherent rapid and directed solidification leading to very fine microstructures and layer-by-layer epitaxial growth. This opens new possibilities to design components where the local material properties are adapted to the local requirements. In addition, the high cooling rates open new possibilities in alloy design. Thus, the solidification microstructure and the correlated segregation structure are very fine, a factor 100 smaller compared to cast ones. Therefore, homogenization heat treatment time is significantly reduced from many hours to some minutes.[12]
It is well known that superalloys with a high γ’-volume fraction such as CM247LC, IN738LC, or CMSX-4® are strongly susceptible to crack formation, e.g., strain age or liquidation cracking. Therefore, these alloys are considered to be hardly weldable or even non-weldable. Thus, processing of these alloys is rather challenging. Recently, there is a strong research activity to qualify these kinds of alloys for processing by additive manufacturing.[13–15] In Reference 16 we have demonstrated that crack-free processing of CMSX-4®via selective electron beam melting is possible. Even single crystals emerged directly from the powder bed by applying a suitable processing strategy.[17]
The aim of this contribution is to investigate the mechanical properties of CMSX-4® single crystals prepared by SEBM. The single crystals are tested in the as-built state and after heat treatment consisting of homogenization and two-step aging. The results are compared with results deduced from conventional cast and heat-treated material.
2 Experimental Procedures
2.1 Sample Preparation
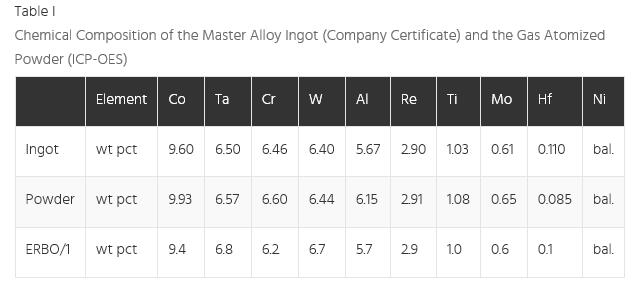
CMSX-4® powder was prepared from a CMSX-4® feedstock (Cannon Muskegon) by gas atomization at TLS Technik GmbH & Co. Spezialpulver KG. The resulting powder was spherical shaped with a targeted size distribution of 45 to 105 µm. Laser diffraction analysis (Malvern Mastersizer 3000) was applied to determine powder size distribution characteristics: D10 = 44.8 µm, D50 = 70.7 µm, D90 = 102.0 µm. The chemical composition of the feedstock and the resulting powder is depicted in Table I.
Sample preparation was performed with an ARCAM A2 EBM system operating at 60 kV accelerating voltage in a controlled 10−3 mbar helium atmosphere. A detailed description of the process was given in References 16,17. During SEBM, the powder bed and building volume are heated by scanning the building area with the defocused electron beam. This sinter and heating step is necessary to increase the thermal and electrical conductivity and also to increase the mechanical stability of the powder bed. In addition, heating with the beam allows to work at extremely high temperatures up to 1100 °C. For CMSX-4®, the preheating parameters (power, time, scanning strategy) were adapted in such a way to keep the operating temperature constant at 1000 °C. The operating temperature is measured with a thermocouple below the start plate. Cylindrical SEBM specimens of 75 mm (hot tensile and fatigue test) and 55 mm (creep test) height with a diameter of 12 mm were prepared by standard hatching (cross-snake) with the following parameters: layer thickness: 50 µm, line energy: 0.6 J/mm, line offset: 100 µm. Contour lines were not applied. The [001] orientation of the single crystal in the specimens is parallel to the building direction.
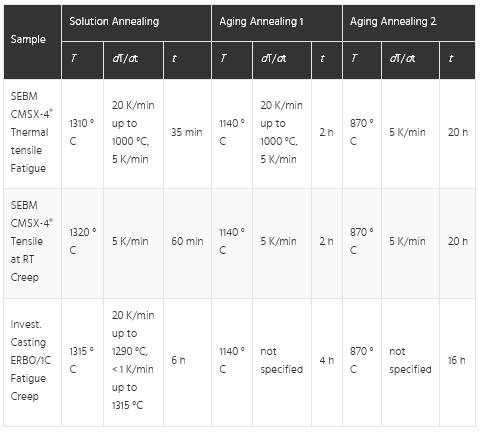
Heat treatment (HT) of the as-built samples follows the conventional heat treatment consisting of solution annealing and two aging steps,[18] see Table II. The solution annealing parameters for the thermal tension and fatigue tests differ slightly from that of the RT tensile and creep tests. The annealing time and temperature were lower to reduce the danger of recrystallization.
Table II
Heat Treatment Parameters
2.2 Mechanical Testing and Microstructural Characterization
2.2.1 Hardness testing
Polished samples were used for the hardness tests. The tests were performed according to HV1 with a computer-controlled low-load micro-indentation tester M-400G from Leco with 15-seconds loading time for each indentation. The mean hardness was determined from three parallel measurement series in building direction with a distance of 0.3 mm. The hardness was determined with the software Hardest from the diagonals of the indentations.
2.2.2 Tensile testing
The tensile tests were performed on an Instron 4505 machine with a 100 kN load cell and a strain rate of 0.83 × 10⁻³/s. For the thermal tensile tests, a furnace for temperatures up to 1250 °C was applied with three PtRh10 pct-Pt thermocouples for temperature measurement and control. In order to achieve a homogenous temperature distribution within the samples, the tensile tests were started 15 minutes after reaching the test temperature. At room temperature, the sensor MFA25 (gauge length: 25 mm) was used for strain measurement. At high temperatures, the strain had to be determined from the traverse movement since the mounting of the sensor was not possible. Sample geometry was chosen according to DIN 50125-B10 × 30 with M10 threads. The samples were machined from the 〈001〉 oriented round samples. Thus, the surrounding polycrystalline (PX) shell and the grain selection zone were removed. The sample diameter in the gauge length was reduced from 6 to 5 mm in order to guarantee a single crystal in the test specimens.
2.2.3 Low cycle fatigue (LCF) testing
Miniature LCF specimens have been machined from SX CMSX-4® SEBM cylinders in the as-built and heat-treated state and from the heat-treated reference cast material ERBO/1C (CMSX-4® type, described in Reference 19). The LCF specimens have a cylindrical measurement length of 6 mm and a corresponding diameter of 2 mm. They were precisely oriented with the Laue technique in combination with spark erosion cutting such that the specimen axis was parallel to the dendrite growth direction ([001] direction). Load-controlled LCF tests have been carried out until rupture at a temperature of 950 °C, with a frequency of 0.25 Hz (triangular signal shape) in tension-tension loading (![]() )
)
. In between LCF tests with different mean stress levels (550 and 590 MPa, respectively) the stress amplitude was kept constant at 130 MPa. The strain was measured indirectly with a mechanical extensometer placed on the fixture. ERBO/1C and CMSX-4® SEBM specimens have been tested with the same parameters in order to compare the results directly.
2.2.4 Creep testing
Miniature tensile creep specimens[20] with the longitudinal axis parallel to the buildup direction, i.e., 〈100〉 direction, have been machined out of the reference cast material ERBO/1C and as-built/HT SX SEBM CMSX-4®. The creep specimens with dog bone geometry have a measurement length of 9 mm and a thickness of 2 mm. The experiments were performed on a creep testing machine from Denison-Mayes-Group, type TC 20 Mark II with three-zone resistance furnace up to 1200 °C. Temperature control is based on up to three Typ S PtRh/Pt-thermocouples with PtRh-shell. As-built and fully heat-treated samples were tested at 850 °C/600 MPa and 1050 °C/160 MPa.
2.2.5 Microstructural investigations
Before and after mechanical testing, microstructural investigations were performed to explore the influence of the as-built or HT microstructure on the underlying deformation and damage processes. Polished sections have been examined by means of scanning electron microscopy (SEM). For fractography of fracture surfaces after fatigue failure, the angle selective backscatter (AsB) detector of the SEM was employed. An electron back scatter diffraction (EBSD) unit attached to the SEM was used for determining crystallographic orientations. The elemental concentration of rhenium was mapped using energy dispersive electron micro probe analysis (JEOL LXA-8100). For the element mappings, an acceleration voltage of 20 kV was used. The step size was 0.5 µm for cast well as SEBM samples. The data acquisition time was 200 ms.
3 Results and Discussion
3.1 Microstructure of Single Crystals Processed by SEBM
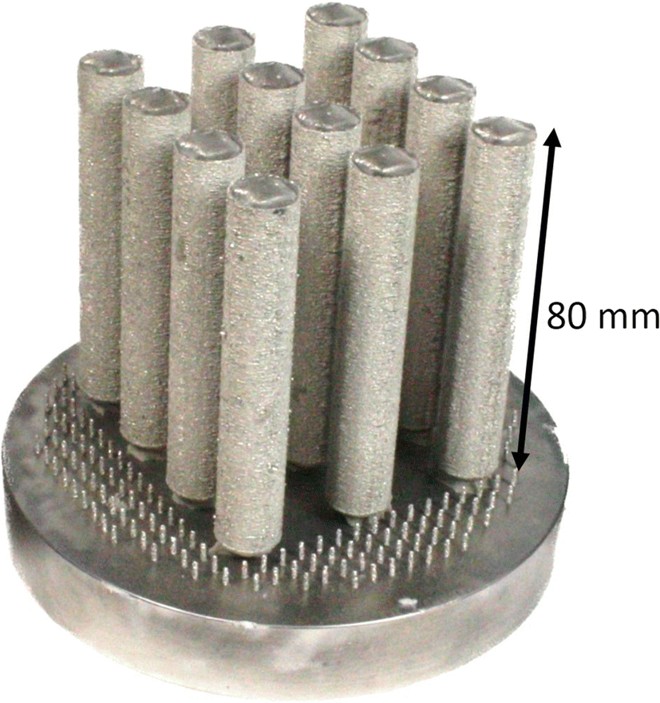
Figure 1 shows cylindrical SX SEBM CMSX-4® samples on the build plate fixed in place by support pins. Each of these samples exhibits a single crystalline core.
Fig. 1
SX CMSX-4® SEBM cylinders for tensile tests on a round IN718® start plate
Vertical cross sections of the cylindrical SEBM samples in the as-built and heat-treated state are depicted in Figure 2. In addition, the corresponding horizontal cross section is shown. Clearly visible is the single crystalline core verified by EBSD analysis. At the bottom of the samples, a grain selection region is visible. After about 15 mm, grain selection is completed. A polycrystalline shell encases the single crystalline core. After heat treatment, the single crystal is still intact, whereas the shell recrystallizes.
Fig. 2
SX SEBM CMSX-4® sample with single crystalline core. (a) Vertical cross section as-built, (b) horizontal cross section and EBSD mapping, (c) vertical cross section after heat treatment

Figure 3 shows the microstructure as a function of the distance to the top layer and the corresponding hardness. Clearly visible is the dendritic solidification microstructure with a dendrite spacing of about 10 µm. The γ’ precipitation size is much larger within the interdendritic in comparison to dendritic regions, Figure 3(c)). Due to the characteristic in situ heat treatment during SEBM sample preparation, the microstructure changes with increasing distance from the surface. During SEBM, each layer is exposed to a specific in situ heat treatment cycle. Layers at the bottom of the sample are much longer subjected to the building temperature compared to layers at the top.[11] As a result, the aging time and thus the γ’ particle size within the dendrite cores increase with the distance to the top layer. The pronounced interdendritic eutectic region is maintained during in situ heat treatment. The evolution of the γ/γ’ microstructure, i.e., the coarsening of the γ’ particles within the dendritic cores, becomes apparent in the behavior of the hardness, see Figure 3(b)). The as-built state shows increased hardness at the surface, where the γ’ particle size is small. With increasing distance from the surface, the hardness decreases due to γ’ coarsening.
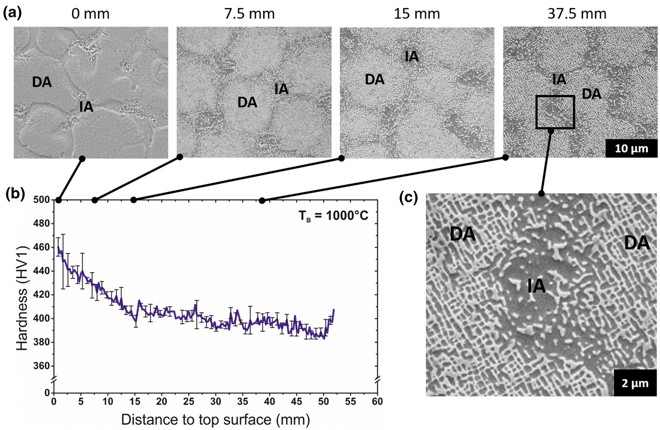
Fig. 3
As-built microstructure and corresponding hardness: (a) SEM images of the microstructure as a function of the distance from the top layer. The cross section is perpendicular to the building direction. Dendritic and interdendritic areas are marked with DA and IA, respectively. (b) Hardness as a function of the distance to the top layer. (c) Magnification of the as-built γ/γ’ microstructure with coarse γ’ within the interdendritic area.
In addition to the varying γ’ size, the as-built materials shows solidification segregations, see Figure 4. After heat treatment, segregations are no more detectable. Even Re, which is the slowest diffusing element[21] in CMSX-4, is homogeneously distributed after 30 minutes annealing time. In addition, the γ/γ’ microstructure is completely homogeneous all over the samples without any residual eutectic or remnants of the solidification microstructure. In conventional castings, complete homogenization is, in practice, never reached due to the nearly two orders of magnitude larger solidification microstructures.[22] Since the annealing time scales quadratic with the dendrite distance, the necessary solution annealing time for the cast alloy would be roughly a factor 1000 to 10000 larger than that for the SEBM material. Thus, the time necessary for homogenization reduces from many hours to some minutes.[12]
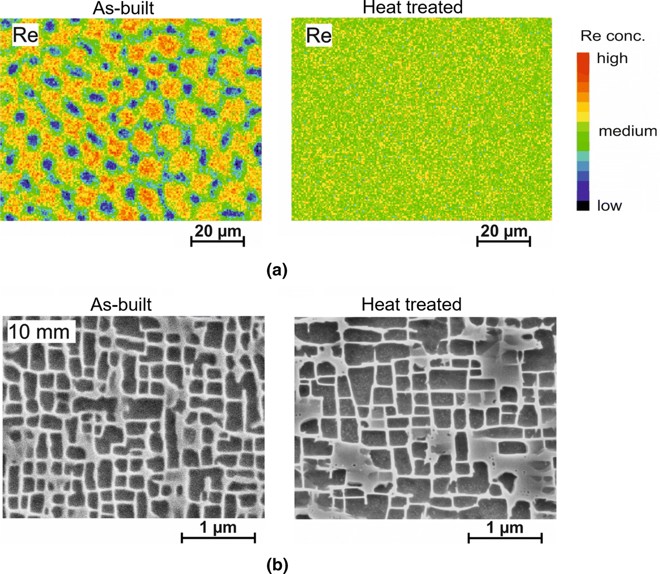
Fig. 4
(a) Re mappings (electron micro probe analysis) of the dendritic solidification structure. As-built state: Re enrichment within the dendritic cores, heat-treated state: completely homogenous Re distribution. (b) SEM pictures of the γ/γ’ microstructure. As-built γ/γ’ microstructure (10 mm from the surface) in comparison with the microstructure after heat treatment. After heat treatment, differences between dendritic core and interdendritic region are no more detectable
Figure 4(b)) shows the as-built γ’ microstructure at a distance of 10 mm to the top layer and in the HT state. After the applied heat treatment, a mean γ’ size of about 450 nm is achieved. Remaining differences in the chemical composition between dendritic and interdendritic regions, which are always present in cast materials after heat treatment, do not exist in the HT SEBM material. Thus, the SX SEBM CMSX-4® material shows unprecedented homogeneity.
3.2 Mechanical Properties of SEBM-Processed Material
3.2.1 Strength
Figure 5 shows stress-strain curves of SX CMSX-4® SEBM specimens at RT, 650 °C, 800 °C, and 950 °
Fig. 5
Stress-strain curves at RT and elevated temperatures. (a) As-built and (b) HT state
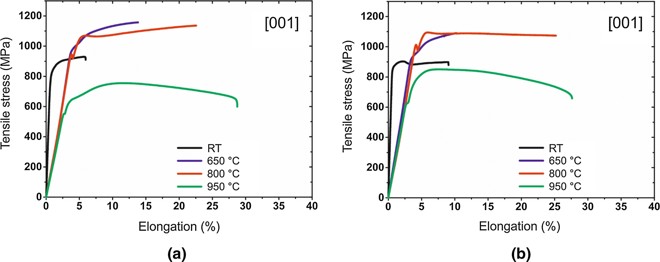
The specimens were tested in the as-built and HT state. Yield strength as well as ductility increases with increasing temperature up to 800 °C. With increasing temperature, the strength decreases whereas the fracture strain further increases. This well-known behavior results from a mechanism change from cutting of the γ’ precipitates by dislocations, resulting in stacking faults and maximum strength, to a climb-assisted bypassing process.[23] In addition and especially for 800 °C, the stress-strain curves show an upper yield point. Beyond this yield point, the stress decreases and eventually increases again due to strain hardening effects. This behavior results from collective dislocation movement as observed before.[24] Favorable orientated glide systems get activated when the critical shear stress is reached. Within the SX, concurrent dislocation movement is possible due to the lack of grain boundaries. As a consequence, the stress decreases due to geometrical softening. Subsequently, dislocations pile up again, other glide systems are activated and multiple slip occurs. In this state, dislocation movement is at more or less constant stress level, if the γ’-precipitation structure is homogenous as within the HT samples.
The homogenous γ’ size distribution within the HT specimens also leads to a higher yield strength compared to the as-built state. Figure 6 shows yield strength and ultimate tensile strength of SX SEBM CMSX-4® samples in the as-built and HT state as a function of temperature. The shaded region indicates reference values for cast and heat-treated CMSX-4® for various γ’ sizes.[25] The yield strength and ultimate strength show a pronounced anomaly similar to the conventional cast material. After heat treatment, the yield strength slightly increases compared to the as-built state, whereas the ultimate tensile strength remains unchanged. This behavior can be ascribed to the inhomogeneous γ’ size distribution and differences of the γ/γ’ morphology within dendritic and interdendritic areas in the as-built state, see Figure 3. In the HT state, the γ’ size is homogeneous all over the sample (see Figure 4) and therefore a large scattering in mechanical properties is barely detectable, as expected.
Fig. 6
(a) Yield strength and (b) ultimate tensile strength of SX SEBM samples in the as-built and heat-treated state as a function of temperature. The yellow area represents literature data for cast material[25]
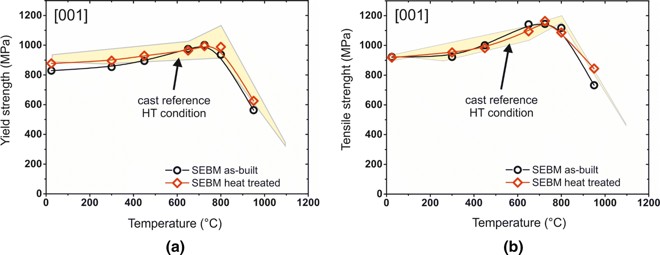
Figure 6 also shows that the strength values of HT SX SEBM CMSX-4® samples are comparable to those measured for conventional cast material.[25] In addition, SX SEBM CMSX-4® virtually shows the same static strength as the heat-treated cast material but already in the as-built condition. There is no significant difference between the SEBM as-built and HT samples. This behavior results from the pronounced in situ heat treatment characteristic for SEBM supported by the fine microstructure due to rapid solidification. That is, as-built SEBM samples are already partly homogenized and aged. The γ’ size within the dendritic area of the as-built samples varies between 70 nm (near the top) and 500 nm (at the bottom) with about 70 vol pct of γ’ phase (for all positions) determined by the linear intercept method. The γ’ size of the HT samples is about 450 nm. Obviously, the γ’ size has no strong influence on the (HT) tensile properties.
3.2.2 Low cycle fatigue strength
Figure 7 shows the mean stress during LCF testing plotted versus the cycles to failure. It can be seen that the HT CMSX-4® SEBM specimens achieve a lifetime as high or even higher than the specimens from the cast and heat-treated reference material ERBO/1C. In contrast, the as-built SEBM specimen fails much earlier than the specimens from heat-treated SEBM and cast material.
Fig. 7
Mean stress vs cycles to failure plot of load controlled LCF tests at 950 °C (R = 0.62 to 0.65; f = 0.25 Hz) for SX CMSX-4® SEBM in the as-built and heat-treated state, and the reference heat-treated cast material
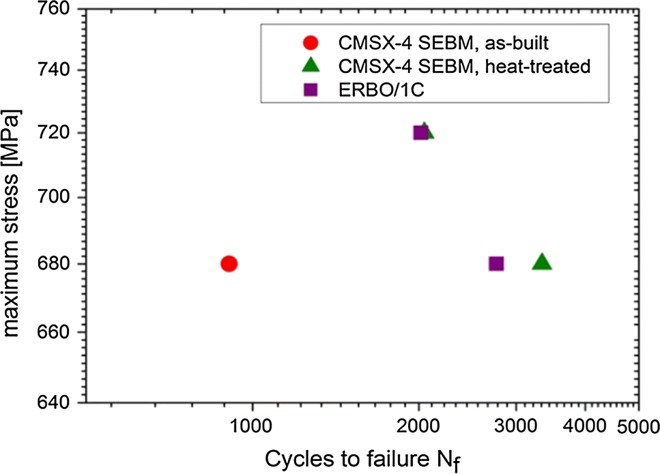
Table III lists the results of the LCF tests. The heat-treated SX CMSX-4® SEBM specimens yield almost twice as high values for elongation (16.8 to 17.1 pct) and contraction (16.4 to 18.4 pct) at fracture compared to ERBO/1C (about 10 pct elongation and 11 pct contraction at fracture). The SEBM as-built sample that showed the lowest fatigue lifetime reached the highest elongation and contraction strains (18.7 and 21.6 pct, respectively).
Table III
Results of LCF Tests for CMSX-4® SEBM and ERBO/1C
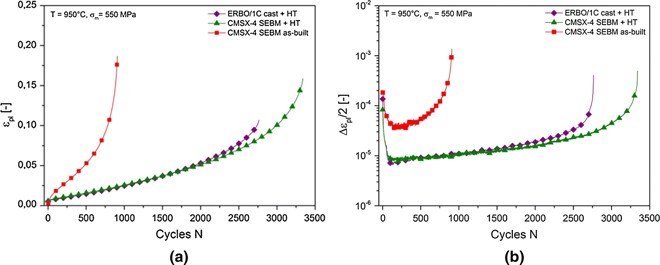
In Figure 8, the accumulated strain and the evolution of the plastic strain amplitude are shown as a function of cycle number. The strain evolution of the SEBM HT and the cast HT material is similar, while the SEBM as-built material shows much faster elongation. The failure strain of both as-built and HT SEBM specimens is comparable and remarkably higher than that of the cast HT specimen. The evolution of plastic strain amplitude depicts an initial decrease for all three material variants until a more or less expressed minimum. This behavior, known as cyclic hardening, can be associated to initiation and moving of dislocations until the dislocation density becomes high enough to constrain further dislocation movement.[26] After reaching the minimum strain amplitude, further increase in the strain amplitude occurs due to simultaneous diffusion assisted deformation processes and onset of damage evolution such as crack formation and crack propagation. The change rate of the strain amplitude is linked to the effective deformation and damage mechanisms.
Fig. 8
Comparison of the [001] LCF behavior of three materials states, the as processed SEBM material (SEBM), the processed and heat-treated SEBM material (SEBM + HT) and the cast reference material (cast + HT). (a) Accumulated strain and (b) evolution of strain amplitude until fracture
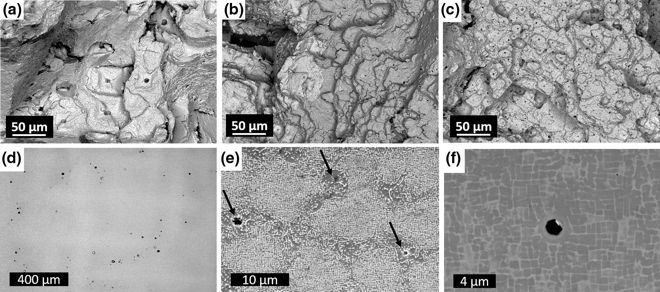
In Figures 9(a) through (c), exemplary fracture surfaces of cast, as-built SEBM and heat-treated SEBM material are shown, and in Figures 9(d) through (f) the characteristic porosity within the different materials is shown. Microscopic investigations by SEM revealed that porosity played a major role in crack initiation in both, SEBM and cast material. Since the solidification microstructure of SEBM material is about two orders of magnitudes smaller as in the cast material, also the size and spacing of pores are much smaller in SEBM material. In longitudinal sections of heat-treated cast material pores are already obvious in the processed material. The mean pore size of the investigated heat-treated cast material is about 63 µm2, as determined in Reference 27. After LCF fracture, fatigue crack initiation at almost each pore of the cast material was observed, with the cracks linking in the fracture plane. In SEBM material, fine interdendritic porosity with a pore size between 1 and 10 µm2 occurs in the entire material. Crack initiation and crack linking at these pores are only observed in the fracture plane.
Fig. 9
(a) through (c): SEM images of fracture surfaces of heat-treated cast material (a), as-built SEBM material (b) and heat-treated SEBM material (c) after LCF test. (a) Heat-treated cast specimen (Nf = 2765, σm = 550 MPa), (b) as-built SEBM specimen (Nf = 908, σm = 550 MPa) and (c) heat-treated SEBM specimen (Nf = 3341, σm = 550 MPa). (d) through (f): Porosity within the different materials. (d) LM picture of cast material: cross section with solidification porosity, (e) SEM picture of the as-built SEBM material: cross section with porosity within the interdendritic regions indicated by arrows, (f) SEBM picture of a pore within heat-treated SEBM material
Cracks associated with initiation at pores are propagating mainly in fracture mode I, perpendicular to the load. The fracture mirror at the individual pores displays a square shape, which results from preferred in plane crack propagation in 〈110〉 directions and has been described for creep and fatigue fracture.[28,29] The fracture surfaces of all specimens revealed areas of mode I fracture initiated by porosity and fracture along crystallographic {111} planes. The ratio between mode I fracture and fracture along slip planes was about 0.5 in both heat-treated specimens and about 0.25 in the as-built SEBM specimen. Further, in contrast to both heat-treated specimens, the as-built specimen revealed in the length section multiple oxidized cracks starting at the surface. The susceptibility of the as-built material for surface cracks can be associated to the build process, adding the material layer by layer leaving some microstructural inhomogeneities between the layers. The thermal treatment has an homogenization effect. That is why less surface cracks are observed in the heat-treated SEBM material after fatigue fracture. However, on the fracture surface of as-built specimens, traces of oxidized surface cracks were found. With this information, the evolution of the strain amplitude in Figure 8 can be further interpreted. The early onset of accelerated increase in strain amplitude observed for the as-built specimen is probably connected to the propagation of surface cracks. The high stress intensity at the surface crack tips is likely to activate macroscopic slip and crack propagation along {111} slip planes, resulting in early specimen fracture. Surface cracks are less frequent and shorter in heat-treated LCF specimens after fracture. Both, heat-treated SEBM and cast specimens displayed a long life time and similar portions of pore-assisted mode I fracture. Differences are the size of pores and pore-connecting cracks as found on the fracture surface and the observation that in length sections cracks are only found in the cast specimen with the larger pores. Obviously, crack initiation at pores started later in the HT SEBM specimen than in the cast specimen. This conclusion is also enhanced by the evolution of the strain amplitude, which is slightly faster for the cast specimen (see slope of the curves after strain amplitude minimum and onset of accelerated increase of strain amplitude in Figure 8(b)) . The reason for the higher ductility of the SEBM material (as-built and heat-treated) compared to the heat-treated cast material is not yet clear. Thus, further investigations of dislocation formation and evolution by TEM are envisaged.
3.2.3 Creep strength
Figure 10 shows two sets of creep curves plotted as strain ε as a function of time t. In the low-temperature high-stress creep regime, the creep curves of the as-built and the solution annealed SEBM material differ strongly. However, after solution annealing, the SEBM data show a very similar creep behavior to the cast material ERBO/1C. The rupture strain of SEBM material (close to 20 pct) is larger than that of the cast material (close to 15 pct). In the high-temperature low-stress regime, the differences between as-built and solution annealed SEBM materials are less pronounced. After solution annealing, the SEBM material shows a very similar rupture strain (close to 20 pct) like the cast material and a slightly better creep resistance.
Fig. 10
Comparison of the [001] creep behavior of three materials states, the as-built SEBM material (SEBM), the heat-treated SEBM material (SEBM + HT), and the cast reference material (cast + HT). (a) Strain εvs time t creep curves from the high-temperature low-stress creep regime (1050 °C, 160 MPa). (b) High-temperature low-stress (1050 °C, 160 MPa) creep data plotted as logarithmic creep rates as function of strain ε. (c) Strain ε vs time t creep curves from the low-temperature high-stress creep regime (850 °C, 600 MPa). (d) Low-temperature high-stress (850 °C, 600 MPa) creep data plotted as logarithmic creep rates dε/dt as function of strain ε
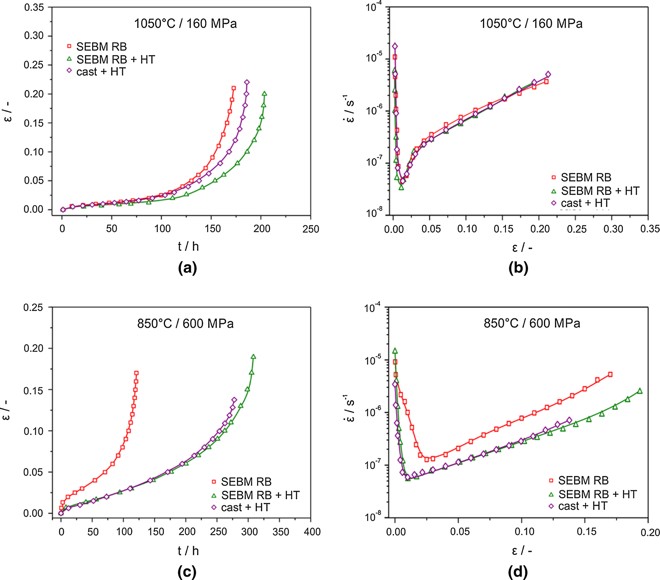
Figure 11 shows the γ/γ’ microstructure in the as-built and HT condition after creep at 850 °C/600 MPa and 1050 °C/160 MPa. After creep, the inhomogeneous γ/γ’ microstructure of the as-built condition is still obvious. Caron et al.[30] have shown that the γ/γ’ size has a strong influence on creep properties for temperatures between 760 °C and 850 °C. Decreasing the γ’ size from 340 to 220 nm strongly reduces the time to fracture. Thus, the small γ’ size within the dendritic regions may explain the high creep rates. Nevertheless, the as-built state shows different particle sizes, small γ’ particles within the dendrites but larger ones within the interdendritic regions. The influence of the γ’ particles within the interdendritic regions on the creep behavior is yet not clear.
Fig. 11
SEM images of the γ/γ’ microstructure after creep. (a) As-built at 850 °C/600 MPa, (b) heat-treated at 850 °C/600 MPa, (c) as-built at 1050 °C/160 MPa, and (d) heat-treated at 1050 °C/160 MPa. The pictures show the microstructure near the fracture plane
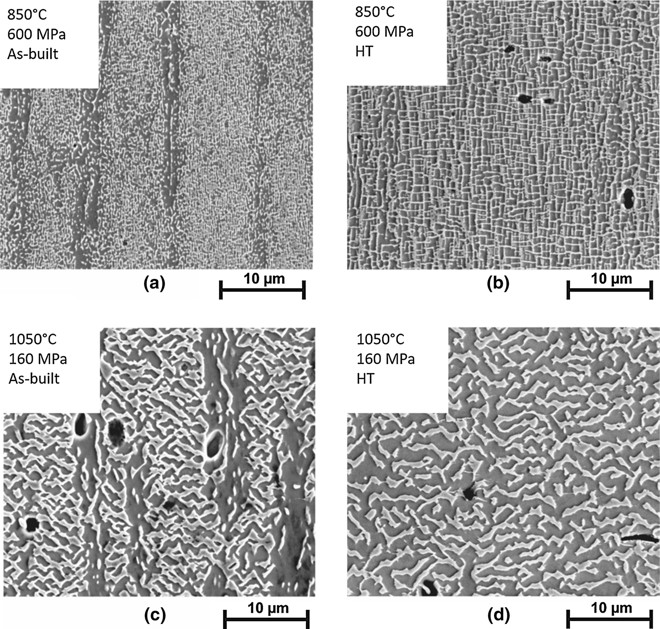
At 1050 °C, the creep curves show no significant differences between as-built and HT samples. Again, this is in accordance with results from Caron et al. [30] where the γ’ size has no strong influence for temperatures between 980 °C and 1050 °C due to coarsening as a result of rafting perpendicular to the load direction.
4 Summary
Mechanical properties of SX CMSX-4® produced by selective electron beam melting (SEBM) have been studied in the as-built and fully heat-treated conditions and compared with conventional cast and heat-treated material. The microstructures of the SEBM and cast material differ in dendrite size by about two orders of magnitude with much smaller dendrite spacing in the SEBM material and consequently much smaller interdendritic solidification pores. Further thermal treatment of the SEBM material results in a complete homogenization such that the dendrite structure vanishes and no chemical segregations remain. The achieved mechanical results are briefly summarized:
•The quasi-static properties of SX SEBM CMSX-4® in the as-built as well as in the HT state match well with HT cast material. The as-built SX SEBM CMSX-4® properties are only slightly different from the HT ones.
•The LCF lifetime of the heat-treated SX CMSX-4® SEBM specimens is superior to that of the heat-treated cast material, whereas the as-built CMSX-4® SEBM specimen failed much earlier than the respective heat-treated SEBM specimen. All SX CMSX-4® SEBM specimens show a considerably higher amount of plastic deformation during high-temperature LCF testing than the specimens from cast materials. Crack initiation sites in the heat-treated materials were pores, while in the as-built SEBM material surface cracks lead to accelerated failure. The as-built material seems to be prone for surface cracks due to microstructure variations between the layers applied during processing. Thermal treatment improves the homogeneity of the material and the resistance against surface crack initiation.
•The creep properties of the heat-treated SEBM material are very similar to those of the HT cast material. In the low-temperature and high-stress creep regime, the rupture strain of the SEBM material is a little larger than that of the cast material. In the high-temperature and low-stress creep regime one cannot distinguish between the creep behavior of HT SEBM and HT conventionally cast Ni-based superalloy single crystals.
From these first investigations, the properties of heat-treated SX CMSX-4® produced by SEBM seem to be comparable or even slightly superior to cast material. The largest effect of the extremely fine and homogeneous microstructure is the improvement of the LCF behavior. The latter results from the fine solidification porosity of SEBM material compared to cast one. Further investigations are necessary to gain a final rating.
Acknowledgment
The German Research Foundation (DFG) and the Collaborative Research Center 103 project A1, A3, and B2 are thankfully acknowledged for the financial support.
Open AccessThis article is distributed under the terms of the Creative Commons Attribution 4.0 International License (http://creativecommons.org/licenses/by/4.0/), which permits unrestricted use, distribution, and reproduction in any medium, provided you give appropriate credit to the original author(s) and the source, provide a link to the Creative Commons license, and indicate if changes were made.
Sources: Springerproffesional


Recent Comments